How do I modify the settings on the Keyence Safety Scanner on my robot cart?

Modifying the safety zone for the safety scanner can lead to incorrect configuration that could disable or reduce the effectiveness of the scanner. It should only be performed if other objects are interfering with robot from running and under the supervision of Intelitek, or Previously Trained personnel.

You will need the scanner password from Intelitek to change the settings; authorized persons should have it already.
1. Download the Safety Device Configurator software from Keyence for the SZ-01s Safety Scanner. https://www.keyence.com/products/safety/laser-scanner/sz/downloads/?mode=so&modelId=PM_214H1S&ad_local=side_soft
2. Install the software using default settings.
3. Connect the USB Cable from the scanner to the pc with the software installed.
4. Open the SZ-Configurator software.

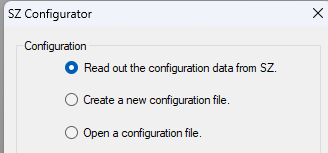
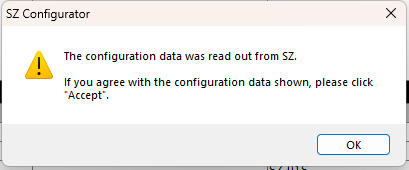
5. Select read out configuration data from SZ and click ok. It will ask for confirmation, click ok.
6. It should read out successfully, if there is an error check the connection.
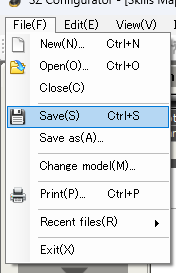
7. Goto the file menu and click save and name your file. Keep it in a safe place for the future.
8. Click on Zone on the left-side of the window.
9. Next click the "Start Realtime Ranging on the right-side window.
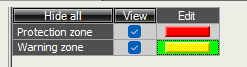
10. This will enable the scanner to show what is happening in real-time. The blue lines are a connected loop, any lines entering the red or yellow area will cause the scanner to show the warning zone.

Note: Lines crossing through yellow into red affect both zones.
11. You can select the zone to edit by clicking on the zone selector. Yellow warning and red Protected.
To change the zone, click on the blue squares and drag them to a new location. Make sure you are not drawing around yourself or a cable hanging over the edge of the table. Changes should only be to accommodate furniture in the room. The color must be constant, if the color is broken/white it is not protected. You can add points to the line by right clicking on the line and selecting set new point here.
You can also double click the blue boxes and type in a location in mm manually.
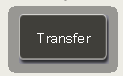
12. When you are ready, click Transfer.
13.Enter password provided by Intelitek.
14. Once the password is entered it should transfer the settings.
15. Once finished the software will prompt that you need to scroll down to the bottom of the settings to accept. Click ok
16. Scroll down and click accept, you will also need to accept the next screen showing the new scanning area.
17. After you accept click Yes to start monitoring. After this step the scanner has the new configuration and is scanning. You can repeat this process until you are satisfied with the results.